
Create a Globally Distributed Tensorflow-Serving Cluster
with Nearly-No-Pain — Using Docker Swarm
Tom Stall
Would you like to get your hands on a Tensorflow-Serving system that you can test and experiment with? Try out the neural network image recognition we hear so much about? Would you like to learn a little more about Docker and the new containerized deployment systems that are changing the way internet applications are built.
If so, this article will give you a good introduction to these topics.
Introduction
This is a quick guide to building a Tensorflow-Serving cluster you may access directly, to evaluate and experiment with.
In a production environment Tensorflow-Serving would be working behind the scenes, one of many back-end building blocks, providing services to power and enhance the user experience of a website or application. Tensorflow-Serving functions in a similar role to database, taking a query and returning a result. Albeit, we would hope, a more advance result than a database.
We divided this article into basically four chapters, in two sections.
In the first section we will build a Tensorflow Serving cluster that you can directly experiment with, but has no lock on the door; anyone can access it. Next we will walk you through the slightly more involved process of building a cluster with some access control.
The second section is about using the cluster to analyze photos. Again, the walk through will be repeated; once for the open (unlocked) cluster and once for the access controlled cluster.
We have tried to make this article self contained, so much of the writing involves explaining preliminaries such as setting up accounts. This might make it appear there is more to setting up these clusters than there really is.
These instructions are based on Linux and the Mac. Windows users should do fine. You will likely be using a Windows equivalent for a terminal and SSH client. Just follow the instructions that come with the tools you choose.
Feel free to skip the access controlled version, if you simply intend to build a cluster, experiment for a short time, then tear the whole thing down.
Getting Started
To host the cluster, we will create three servers in the cloud. One in San Francisco, one in London and one in Bangalore. We will use DigitalOcean as our cloud provider.
If you would rather use a different cloud provider or use your own servers, or don’t feel so internationally inclined, feel free to ad-lib and join us further down where we actually set up the cluster.
DigitalOcean Account Preliminaries
If you don’t have an account on DigitalOcean you will need to set one up. Go here https://www.digitalocean.com/, press on Sign Up and follow their sign up process. (This link should give you a $10 credit towards your time) You will need a credit card to pay. Their rates are fair, however if you are not interested in paying to run the servers beyond this learning project, destroy your servers (“Droplets”).
Add your SSH public key (most likely from your laptop) to your DigitalOcean account. This allows you to log into the servers you create. You can do this when you set up your first server (called a Droplet on DigitalOcean), or by going to the security settings under account->settings.
Your public key, in most cases, is in the ~/.ssh/id_rsa.pub file. Open this file in an editor to view it. Then cut it and then paste it into the public key form on DigitalOcean.
If desired, here is a longer explanation. https://www.digitalocean.com/community/tutorials/how-to-configure-ssh-key-based-authentication-on-a-linux-server
Create your servers
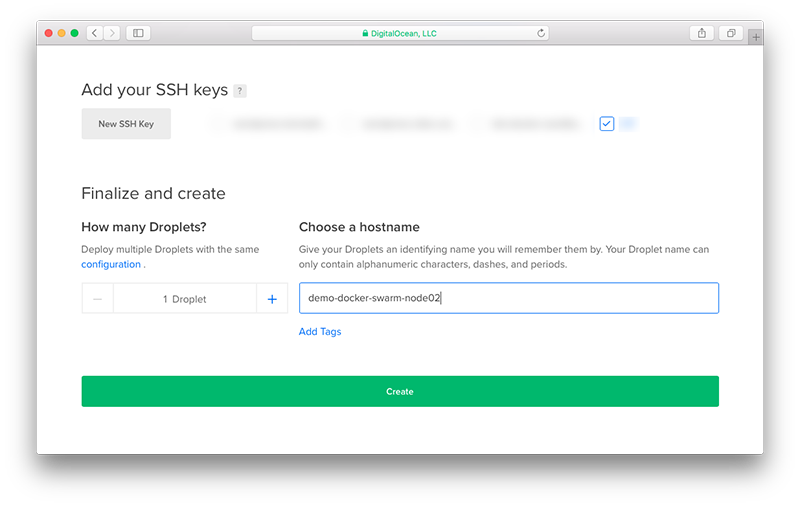
From the DigitalOcean control panel create three servers (Droplets). These will become the nodes in the Tensorflow-Serving cluster. For this demo we will name them demo-docker-swarm-node01, demo-docker-swarm-node02 and demo-docker-swarm-node03, in San Francisco, London and Bangalore respectively.
Repeat these steps for each node:
Click on Create Droplet, select the Docker on 14.04 “One-click app”
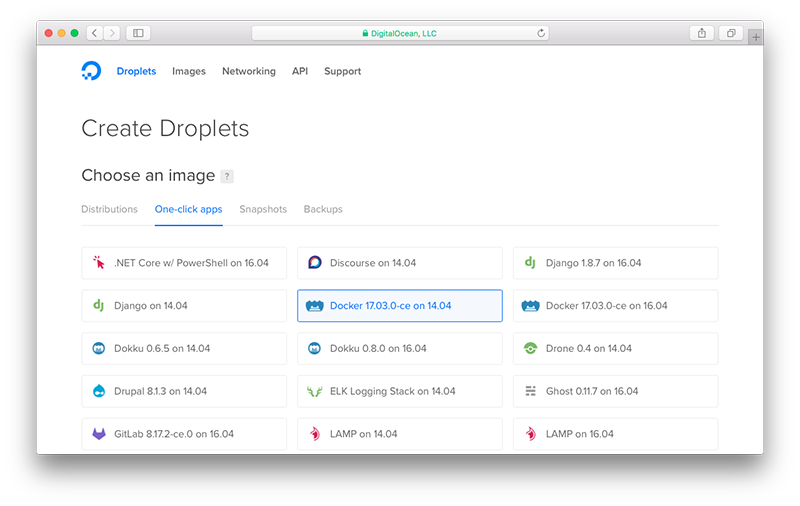
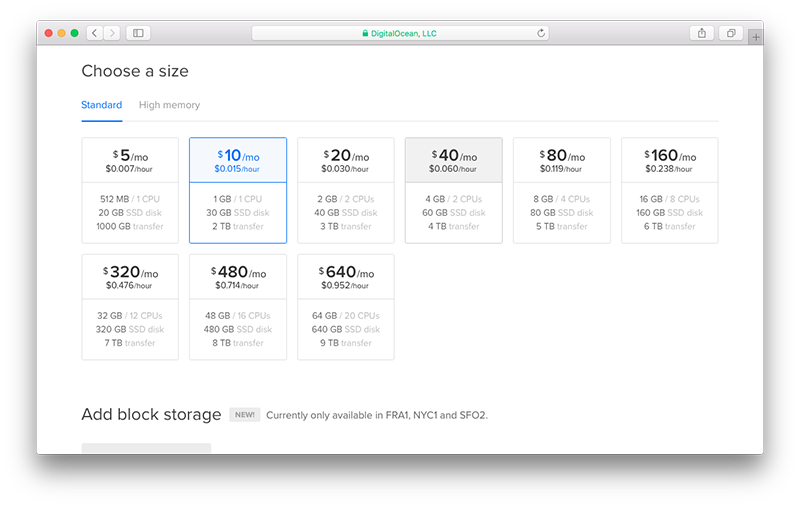
Next, select the Droplet size. In this case the 1GB size is needed for each node.
Next, choose a datacenter and monitoring. (San Francisco, London or Bangalore)
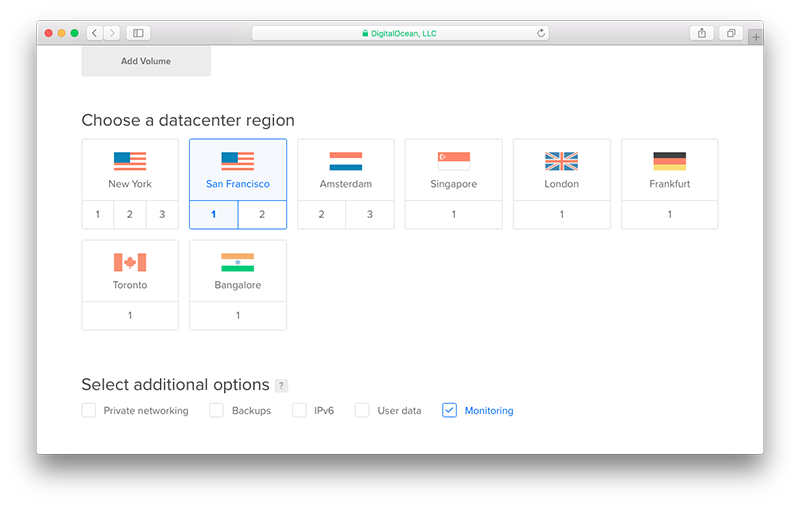
Select your SSH key or upload it, if not already uploaded.
Then give a name to your Droplet. (In the screen shot it is the example node name for the London node)
Then click Create
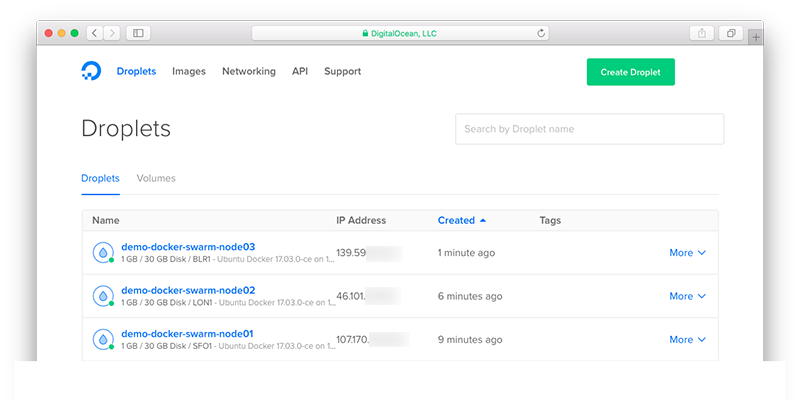
After doing the above steps the third time, you should end up with three running nodes; something like this:
Create the Swarm (cluster)
From the Droplets list on your DigitalOcean control panel, copy the IP address of node01 (San Francisco) and ssh into this server.
ssh root@xxx.xxx.xxx.xxx
Run the “docker swarm init” command using the same IP address as you used to log (ssh) in.
docker swarm init --advertise-addr xxx.xxx.xxx.xxx
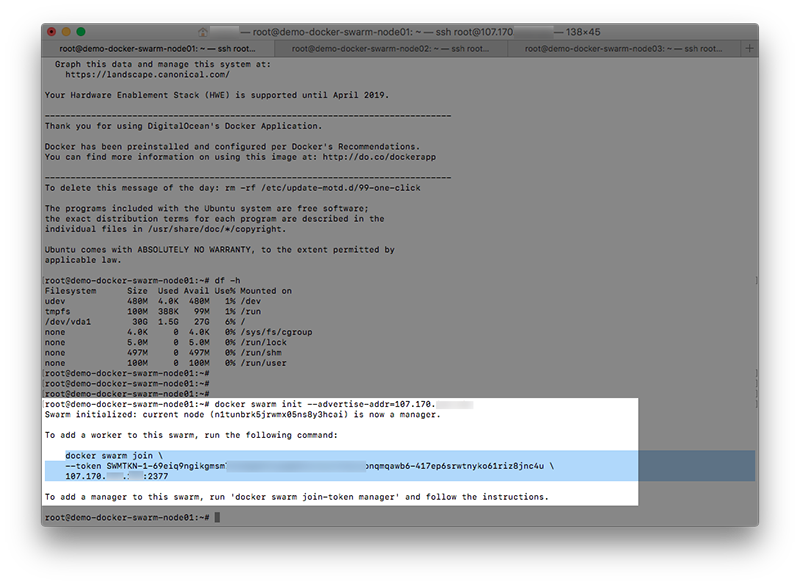
You will get a suggested docker swarm join command. Use it (copy and paste) within the other two nodes to join them to the Swarm.
For example, here is the join command run on the Bangalore node. (Please use the join command you were given by the init command, not this one.)
root@demo-docker-swarm-node03:~# docker swarm join --token SWMTKN-1-4zt5l..... xxx.xxx.xxx.xxx:2377
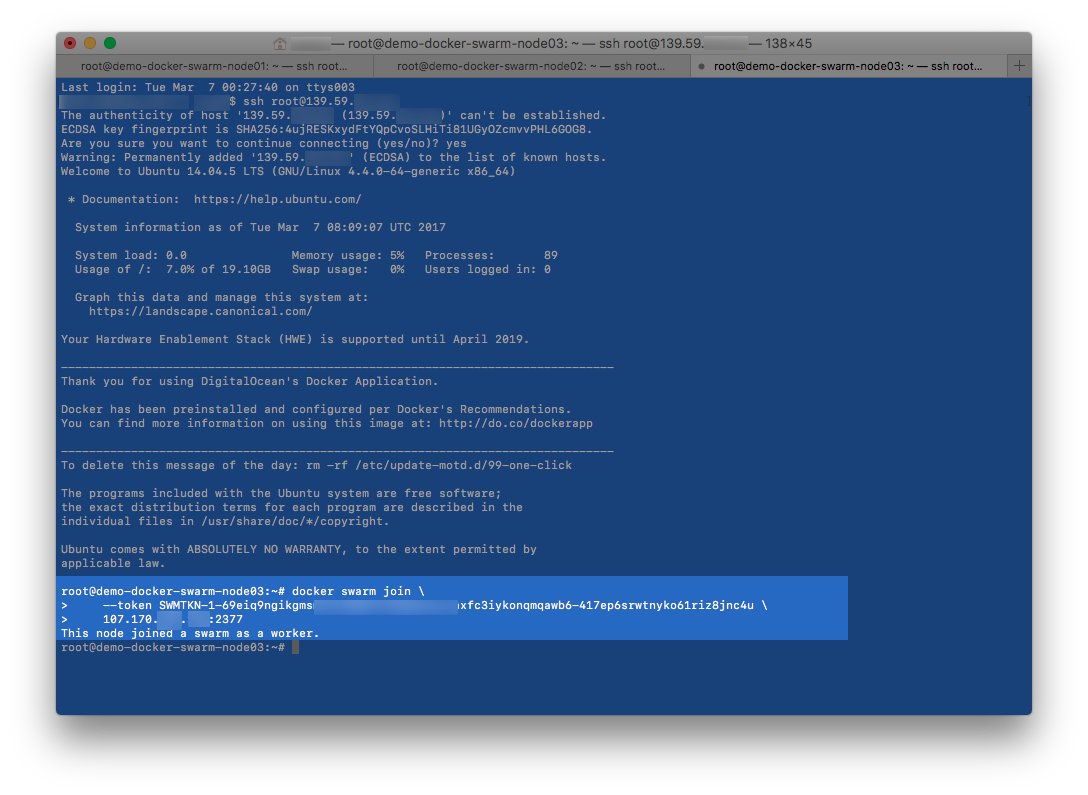
OK. The swarm is running!
Well, if your nodes did not join the swarm, such as a timeout message, the most likely cause is that not all the ports needed for the swarm nodes to communicate with each other are open.
The 16.04 Ubuntu version of the Docker Droplet has this problem. If by chance the 14.04 version used here has been changed and now blocks ports, follow these instructions. https://www.digitalocean.com/community/tutorials/how-to-configure-the-linux-firewall-for-docker-swarm-on-ubuntu-16-04
The ports could be blocked elsewhere in your network by AWS, personal or corporate firewall/routing rules.
If all else fails, just set up a swarm on a local network. May not be as glorious as global distribution, but you still will be able to learn how build and run a Docker Swarm.
Let’s setup and run the open (unlocked) Tensorflow Serving Cluster.
On the swarm master node (node01 San Francisco) open an editor and paste the following Docker Compose instructions. Save it into a file named tensorflow-serving-docker-stack.yml
For example:
root@demo-docker-swarm-node01:~# vi tensorflow-serving-docker-stack.yml
- If you don’t know vi Google for a cheat sheet. The commands you will run in order are: i, (paste in the Docker Compose code), esc (the escape key), :w, enter, :q, enter
version: "3"
services:

  tensorflow-serving:
    image: mountaintom/tensorflow-serving-inception-docker-swarm-demo
    ports:
      - "9000:9000"
    command:
      - /serving/bazel-bin/tensorflow_serving/model_servers/tensorflow_model_server
      - --port=9000
      - --model_name=inception
      - --model_base_path=/serving/inception-export
    deploy:
      replicas: 6

  viz:
    image: dockersamples/visualizer:stable
    ports:
      - "8080:8080"
    stop_grace_period: 1m30s
    volumes:
      - "/var/run/docker.sock:/var/run/docker.sock"
    deploy:
      placement:
        constraints: [node.role == manager]
Now run the command:
root@demo-docker-swarm-node01:~# docker stack deploy --compose-file tensorflow-serving-docker-stack.yml tensorflow-serving
You should see the following returned from the command.
Creating network tensorflow-serving_default
Creating service tensorflow-serving_tensorflow-serving
Creating service tensorflow-serving_viz
Now the cluster is deploying. The first time it will take many minutes to deploy because the tensorflow-serving… Docker image is a very large download. After that, redeploying the swarm happens in seconds.
If you run the command:
docker ps
you should see a number of containers running.
Back at your local machine, point your browser to http://xxxx.xxxx.xxxx.xxxx:8080
You should see this web page showing the deployed cluster.
- Where xxxx is the IP address (ssh login) of any of your nodes.
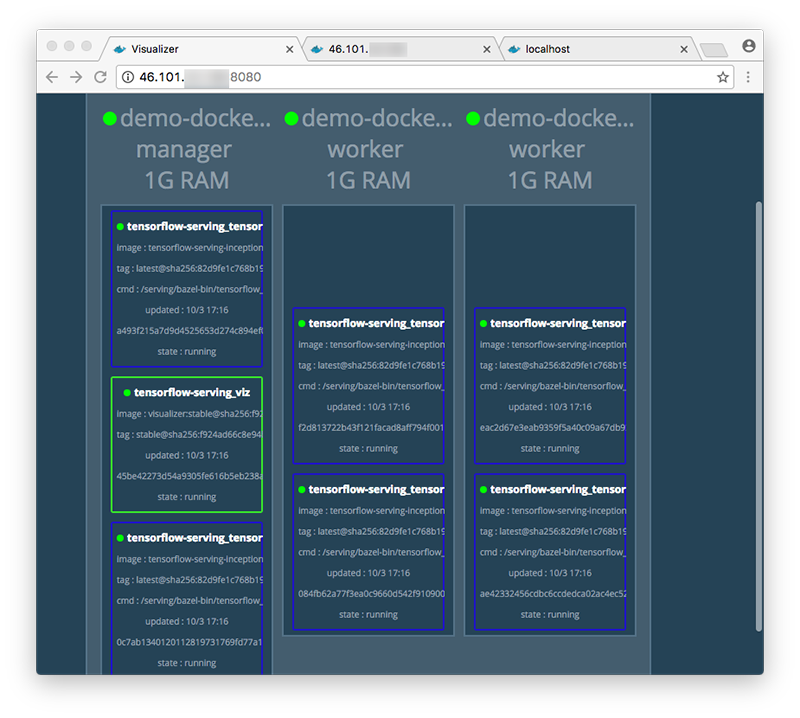
And there your are, a cluster of six Tensorflow servers spread across three continents.
What’s interesting is the visualization container is in San Francisco and the address we used for access to the cluster was in London.
Docker Swarm has created a mesh network that builds a common connection to all three nodes and will automatically route the request, across the cluster, to the Visualization container.
If multiple containers can serve a request the mesh network will round robin to those containers. Although, in my limited testing, it does seem to give preference to the node you connected from.
The cluster is now ready to serve your Inception Client requests.
Skip ahead, if you wish, to the inception client section, for the “open” cluster, analyze some photos, then return to here.
If your are more interested is seeing the serving clusters run without getting into the client aspects yet, then just continue on from here. Accessing the visualizer is a simple way of working with the cluster.
Now let’s build a more secure Tensorflow serving cluster, with access control.
You have been very busy with the inception neural network classifying your cat photos, and are rightfully impressed with, additionally, how astutely it perceives some of your cats’ most endearing and subtle qualities of Bengal tigers or panthers.
Yet, something is wrong. Your are just not able to process as many cat photos in a day. You investigate and to your dismay someone has discovered you Tensorflow cluster and is running large batches of their cat photos on your servers. Worst yet, dog photos, too.
That has to stop. So lets put some kind of access control on this thing.
Lets do this without going overboard; building a whole web site infrastructure. So, step in the venerable SSH tunnel; with all its admirable qualities and warts.
This cluster will be referred to as the “ssh-tunnel” cluster from this point on.
Shut down any already running Tensorflow-Serving Swarm cluster with the following command:
root@demo-docker-swarm-node01:~# docker stack rm tensorflow-serving
Listing the services should change from this:
root@demo-docker-swarm-node01:~# docker service ls
ID            NAME                                   MODE        REPLICAS  IMAGE
6mukbpf62os0  tensorflow-serving_tensorflow-serving  replicated  6/6       mountaintom/tensorflow-serving-inception-docker-swarm-demo:latest
xn79tnfdlmys  tensorflow-serving_viz                 replicated  1/1       dockersamples/visualizer:stable
To:
root@demo-docker-swarm-node01:~# docker service ls
ID  NAME  MODE  REPLICAS  IMAGE
Log back into the Swarm master node (node01 San Francisco)
Open an editor and paste the following Docker Compose instructions. Save it into a file named tensorflow-serving-ssh-docker-stack.yml
For example:
root@demo-docker-swarm-node01:~# vi tensorflow-serving-ssh-docker-stack.yml
- If you don’t know vi Google for a cheat sheet. The commands you will run in order are: i, (paste in the Docker Compose code), esc (the escape key), :w, enter, :q, enter
version: "3"
services:

  tensorflow-serving:
    image: mountaintom/tensorflow-serving-inception-docker-swarm-demo
    networks:
      - internal
    command:
      - /serving/bazel-bin/tensorflow_serving/model_servers/tensorflow_model_server
      - --port=9000
      - --model_name=inception
      - --model_base_path=/serving/inception-export
    stop_grace_period: 1m
    deploy:
      replicas: 6

  ssh-tunnel:
    image: anthonyneto/sshserver
    networks:
      - internal
    ports:
      - "2222:22"
    stop_grace_period: 1m
    deploy:
      mode: global
    depends_on:
      - tensorflow-serving
    environment:
      - ssh_key=${PUBLIC-KEY}

  viz:
    image: dockersamples/visualizer:stable
    networks:
      - internal
    stop_grace_period: 1m
    volumes:
      - "/var/run/docker.sock:/var/run/docker.sock"
    deploy:
      placement:
        constraints: [node.role == manager]

networks:
  internal:
    driver: overlay
    driver_opts:
      encrypted: ""
So what’s different about this Swarm?
First, we have created an isolated network named “internal” and attached the tensorflow-serving containers to it. This network spans the all the nodes, connecting the whole Swarm cluster together.
Second, we added ssh gateway containers, attached them to the isolated network and exposed the ssh containers to the internet.
Third, we used the encryption support, built into Docker Swarm, to make the network (named internal) secure as it sends data between the nodes. This is fairly optional for cat photos, so you could disable encryption if your network has any issues with protocol 50 (esp) traffic. If you were running a website that uses HTTPS to your users, then used a front-end proxy to decrypt the ssl and send unencrypted HTTP data to your backend web servers, then using an unencrypted backend network between nodes, would be a bad idea.
If you care about the encryption you can run this command on the master node (San Francisco), to double check if esp traffic is flowing.
sudo tcpdump -p esp | less
Fire up the new ssh-tunnel (access controlled) Tensorflow Server Cluster.
On the swarm master node (node01 San Francisco) run the commands:
root@demo-docker-swarm-node01:~# export SSH_PUBLIC_KEY_TF=$(cat ~/.ssh/authorized_keys)

root@demo-docker-swarm-node01:~# docker stack deploy --compose-file tensorflow-serving-ssh-docker-stack.yml tensorflow-serving
You should see the following returned from the command.
Creating network tensorflow-serving_internal
Creating service tensorflow-serving_tensorflow-serving
Creating service tensorflow-serving_ssh-tunnel
Creating service tensorflow-serving_viz
This time the containers are already downloaded and the cluster should deploy almost immediately.
Open another terminal on your local machine and run the following command:
Where the IP address is any one of the address of your nodes.
ssh root@46.101.xxx.xxx -p2222 -L 8081:viz:8080 -L 9001:tensorflow-serving:9000
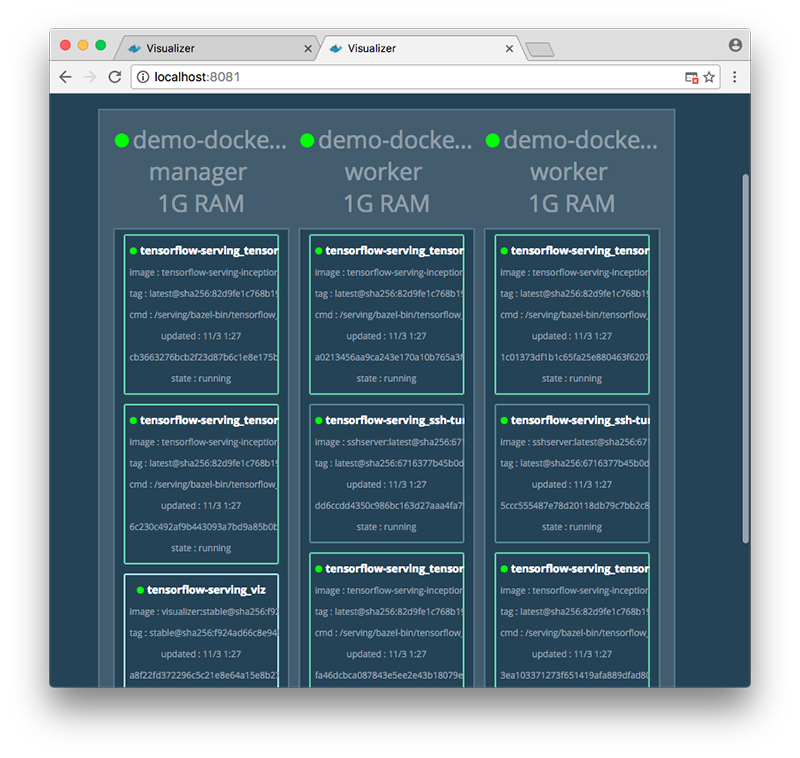
Point your browser to http://localhost:8081
You should see this web page showing the deployed cluster.
SSH Tunnels — The Good, Bad and the Ugly
If all went well you were logged right in to the SSH proxy when you executed the “ssh root@46.101.xxx.xxx -p2222 -L….” command.
If not double check if the correct public key was used to load the SSH proxy.
On the master node DigitalOcean loaded the public key you specified into the /root/.ssh/authorized_keys file. Because you were able to log into the master node, that is basic verification that the public/private key-pair you use are working.
The command “export SSH_PUBLIC_KEY_TF=$(cat ~/.ssh/authorized_keys)” copied the key you successfully used to login with to the environment so the Docker Compose script could add it to the authorized_keys file in each of the ssh tunnel servers.
If you built this Swarm on your own or some other cloud provider, the main likelihood is you logged in as one account then su’d to another to do your work. Just use the keys for account you work from, if it was not root.
Next, the most annoying thing you will encounter is this message:
ssh root@46.101.xxx.xxx -p2222 -L 8081:viz:8080 -L 9001:tensorflow-serving:9000
@@@@@@@@@@@@@@@@@@@@@@@@@@@@@@@@@@@@@@@@@@@@@@@@@@@@@@@@@@@
@    WARNING: REMOTE HOST IDENTIFICATION HAS CHANGED!     @
@@@@@@@@@@@@@@@@@@@@@@@@@@@@@@@@@@@@@@@@@@@@@@@@@@@@@@@@@@@
IT IS POSSIBLE THAT SOMEONE IS DOING SOMETHING NASTY!
Someone could be eavesdropping on you right now (man-in-the-middle attack)!
It is also possible that a host key has just been changed.
The fingerprint for the ECDSA key sent by the remote host is
SHA256:At5iA/eWu4LNFNmBHrA+m+yubuofw/iDO53Fjyq3Zw.
Please contact your system administrator.
Add correct host key in /Users/johndoe/.ssh/known_hosts to get rid of this message.
Offending ECDSA key in /Users/johndoe/.ssh/known_hosts:36
ECDSA host key for [46.101.xxx.xxx]:2222 has changed and you have requested strict checking.
Host key verification failed.
You need to open an editor on your local computer and remove the offending entry in your known_hosts file. It will almost always be the last one; in this case the one on line 36.
vi ~/.ssh/known_hosts
The commands you will run in order would be: :36, enter, dd, :wq, enter
* In this case :36. Use the number the from the message you have.
The reason for this is, every time you shutdown and redeploy the Swarm Cluster the containers are brand new. So SSH thinks the remote machine is a new computer on the previously used IP address. And it is.
When you successfully connect to the SSH proxy it will look like this:
The authenticity of host '[46.101.xxx.xxx]:2222 ([46.101.xxx.xxx]:2222)' can't be established.
ECDSA key fingerprint is SHA256:rwDr9wm8jGldKzOl8G0au9akeupb2+K6Lqb8eqgpkJtg.
Are you sure you want to continue connecting (yes/no)? yes
Warning: Permanently added '[46.101.xxx.xxx]:2222' (ECDSA) to the list of known hosts.
Welcome to Alpine!
The ssh tunnel server has nslookup and wget installed, so you can look around on the internal network, but you really only logged in here to establish the ssh tunnels to the Tensorflow server (tensorflow-serving) and the Visualizer (viz). These will show up on your machine as localhost:9001 and localhost:8081 respectively.
Finally, the SSH connection will drop from time to time, forcing you to log in again. Running “top” inside the SSH proxy seems to help keep the tunnel alive.
Congratulations! You have built the ssh-tunnel version of the Tensorflow Serving cluster. Continue on to the next section that covers running the Tensorflow inception client.
Lets get started analyzing those cat pictures.
In this section we will, first, use the open Tensorflow-Serving cluster to analyze a photo. Then we will switch to the ssh-tunnel version and analyze another.
Of course, you can analyze all the photos you want on either cluster, but for simplicity we’ll describe the process for one photo on each.
If you already have been working with Tensorflow Serving and have compiled the Inception model and client, just point your client to one of the nodes at port 9000 if you run the open cluster, or localhost:9001 if you run the ssh-tunnel cluster.
For everyone else, we will describe the process using a pre-built Docker container client running on your local machine.
If you haven’t been using Docker on your local computer, go to the Docker site, download and install it.
Docker for Mac instructions and download are here:
https://www.docker.com/docker-mac
We will be using “Docker for Mac” in this article. But, you should be able to follow along if you are using another platform.
Docker For Mac should start automatically, after installation. It has a little GUI interface, but we will do everything from a terminal using the Docker command line interface.
Start the Tensorflow inception client container.
Do so by running the following command on your local computer.
docker run -it --name tensorflow-serving-demo --hostname tensorflow-serving-demo mountaintom/tensorflow-serving-inception-docker-swarm-demo
- If this is the first time you have run this Tensorflow Serving Docker container, the container will be downloaded. It is going to take quite a while to download as the container is large.
-
Good news though, is this container has the full Tensorflow Serving source tree in a git repository, and I fixed some bugs that kept the build process from completing a successful compile. So, once you have it, you have a packaged development platform to use. I left some useful example commands in the bash_history. The container is a month or so old, (at the time of writing this article), so do a git pull and re-compile if you wish. Note that TensorFlow is a large program and it takes a long time and a lot of memory to compile. Additionally, I bumped up the timeout on the client, as most neural networks are deployed on servers GPU coprocessors that vastly speed things up.
Once the container starts you should be in a terminal inside the container. Similar to this:
root@tensorflow-serving-demo:/#
To exit the container press ctl-d in your terminal. You will exit and the container will stop running.
If the container is not stopped, you can stop it with this command:
docker stop tensorflow-serving-demo
You can restart and get a new terminal into the container with these commands:
docker start tensorflow-serving-demo
docker attach tensorflow-serving-demo
Analyze your first photo with the “open” Tensorflow-Serving cluster.

Prep the servers.
Open a second terminal and ssh into the master (San Francisco) node.
Stop any currently running tensorflow-serving cluster and deploy the “open” cluster with the following commands:
docker stack rm tensorflow-serving
Then give the cluster a minute or so to completely shut down before deploying.
Now start it with the command:
docker stack deploy --compose-file tensorflow-serving-demo01-docker-stack.yml tensorflow-serving
Return to the terminal you have attached to the Tensorflow inception client container.
Inside the “client” container, run the commands below to send a photo the the servers and get get the results.
- Pick an address of one of your nodes and replace the example –server address “107.170.xxx.xxx” with your real address.
cd /serving

root@tensorflow-serving-demo:/serving# bazel-bin/tensorflow_serving/example/inception_client --server=107.170.xxx.xxx:9000 --image=/serving/inception-client-test-photos/BearMountain-20140209-06.jpg
Here is the output; just what all these neurons thought they saw.
outputs {
  key: "classes"
  value {
    dtype: DT_STRING
    tensor_shape {
      dim {
        size: 1
      }
      dim {
        size: 5
      }
    }
    string_val: "bannister, banister, balustrade, balusters, handrail"
    string_val: "breakwater, groin, groyne, mole, bulwark, seawall, jetty"
    string_val: "cliff, drop, drop-off"
    string_val: "ski"
    string_val: "Yorkshire terrier"
  }
}
outputs {
  key: "scores"
  value {
    dtype: DT_FLOAT
    tensor_shape {
      dim {
        size: 1
      }
      dim {
        size: 5
      }
    }
    float_val: 12.9643516541
    float_val: 4.85569190979
    float_val: 4.01685523987
    float_val: 3.96419501305
    float_val: 3.91511273384
  }
}
Analyze your second photo with the “ssh-tunnel” Tensorflow-Serving cluster.

Prep some new SSH keys for the “client” container.
If you have not started the client container, start one per the “Start the Tensorflow inception client container.” instructions above.
For simplicity we are going to connect to the ssh-tunnel directly from the client container.
The tradeoff is that our already blistering fingers will need to type yet some more to describe generating ssh keys on the client container and transferring the public key to the Tensorflow Serving cluster. You eyes will have to scan back and forth through another few paragraphs.
You are welcome to experiment with other connection methods, including connecting back though your laptop (host) network or extending the “internal” Swarm network right into the client container running on your laptop.
So here we go. Let’s generate a SSH key-pair.
Back inside the Tensorflow Client container, that you started previously, run the following commands:
root@tensorflow-serving-demo:~# ssh-keygen
The output that will follow is:
* For each requested input, just hit enter.
Generating public/private rsa key pair.
Enter file in which to save the key (/root/.ssh/id_rsa):
Created directory '/root/.ssh'.
Enter passphrase (empty for no passphrase):
Enter same passphrase again:
Your identification has been saved in /root/.ssh/id_rsa.
Your public key has been saved in /root/.ssh/id_rsa.pub.
The key fingerprint is:
e1:96:ad:df:03:df:9d:ec:db:03:bd:4f:40:85:fa:2d root@tensorflow-serving-demo
The key's randomart image is:
+--[ RSA 2048]----+
|               ..|
|              .. |
|        .    ..  |
|       . +  ..   |
|        S .  .o. |
|       . ..  .Eo.|
|        .  o .oo+|
|         . .o .*o|
|          . ...o*|
+-----------------+
Display the generated public ssh key so you can copy it and paste it into the master node of the serving cluster. For example, using “cat”.
root@tensorflow-serving-demo:~# cat /root/.ssh/id_rsa.pub
The public key is now printed on your terminal.
Select/Highlight the key data with your mouse/trackpad and copy it to the clipboard.
Now log into the master node (San Francisco) of your serving cluster and run the following command: (using your key)
- Paste your key in place of the one shown in the example.
- Your key (including the “ssh-rsa”) fits in between the “(echo ” and the ending “)”
- If you use the key below as shown, you wont’t be able to log into the ssh tunnel, but I might 🙂
root@demo-docker-swarm-node01:~# export SSH_PUBLIC_KEY_TF=$(echo ssh-rsa AAAAB3NzaC1yc2EAAAADAQABAAABAQDKKGOVAEXQ1SRJh9XbmXtFEqjqBf8cl6X/J8MwM6W9W/DAjLG2eJOE1iWreZPSsnNAQU1f6oqMYZZSH58hJLeZ4TR772iNrlXgKHgid272vFSYsBoPv+04+T5+zsXQJWR/Cv5Te8aMEtg9EJ3bYpW0XZKA+OVz0lfy2JSCJnUhM7nBlf9mNzSScgQ3o8cpQ6D7dIQehiuUlr0tGGwvtAhAnpBkcdxnKtH219VwVp+xPpNra4x+lq60aDEHrnyJjoBJSynLpmq8aF6TOoKIRYJ9ldkvX5Ld/kfeF+k5zvlw40AE0EO+MHw3d/engdT+GvYRKLzBkjI+85VsumZVXNrr root@tensorflow-serving-demo)
- You should now be able to attach to the ssh tunnel server from the Tensorflow client container. Because the current ssh-tunnel server can only hold one key at a time, you no longer will be able to connect from your local (laptop?) machine. Sharing private keys is not a good practice, so don’t use that as a workaround to generating these keys. Especially, don’t share your laptop’s private key.
That’s it for keys.
Prep the servers.
Log into the master node (San Francisco) and run the following commands to shut the cluster and redeploy it:
* The shutdown is needed so the ssh tunnel servers can pick up the new ssh key you created.
root@demo-docker-swarm-node01:~# docker stack rm tensorflow-serving
Then give the cluster a minute or so to completely shut down before deploying.
Now redeploy the cluster with the command:
root@demo-docker-swarm-node01:~# docker stack deploy --compose-file tensorflow-serving-ssh-demo01-docker-stack.yml tensorflow-serving
Return to the Tensorflow inception client terminal.
- Or start one per the instructions in the earlier section, if you bypassed that step.
Attach to the ssh tunnel server of one of the server nodes in the serving cluster, with the command:
- Pick an address of one of your server nodes and replace the example address “46.101.xxx.xxx” with your real address.
root@tensorflow-serving-demo:~# ssh root@46.101.xxx.xxx -p2222 -fN -L 8081:viz:8080 -L 9001:tensorflow-serving:9000
You should have connected with the SSH tunnel. There may be some prompts. Follow the instructions that were laid out in the earlier in this article.
The ssh command should go into the background mode so you can continue to use the terminal to run commands in this Tensorflow client container.
Inside the “client” container, run the commands below to send a photo the the servers and get get the results.
cd /serving

root@tensorflow-serving-demo:/serving# bazel-bin/tensorflow_serving/example/inception_client --server=127.0.0.1:9001 --image=/serving/inception-client-test-photos/grace_hopper.jpg
Here is the result:
outputs {
  key: "classes"
  value {
    dtype: DT_STRING
    tensor_shape {
      dim {
        size: 1
      }
      dim {
        size: 5
      }
    }
    string_val: "military uniform"
    string_val: "bow tie, bow-tie, bowtie"
    string_val: "mortarboard"
    string_val: "suit, suit of clothes"
    string_val: "academic gown, academic robe, judge\'s robe"
  }
}
outputs {
  key: "scores"
  value {
    dtype: DT_FLOAT
    tensor_shape {
      dim {
        size: 1
      }
      dim {
        size: 5
      }
    }
    float_val: 8.37368202209
    float_val: 7.29904556274
    float_val: 6.52606487274
    float_val: 5.8752655983
    float_val: 5.62438583374
  }
}
Parting thoughts.
If you want to leave everything up for an extended period of time, we suggest you go for the “ssh-tunnel” server version. The “ssh-tunnel” version, sans ssh-tunnels, is closest to how a cluster, not exposed to the internet, would be deployed in a production back-end environment.
We only set up one master but, as you only have three nodes, you may want to make each node a master. Three masters is a good starting point, even if you increase the number of workers.
Remember, this cluster is costing money until the droplets are destroyed. So when you are done, destroy them.
Once you have gone through this tutorial, it does not take much time to recreate everything the next time. As so much of this article describes preliminaries. The actual running/deployment does not involve many operations.
We truly hope you enjoyed this tutorial, and setting up and running your own Tensorflow model server.